Tuesday, October 25, 2011

Creative Halloween -- The Handmade Variety

My children are all adults and don't ask for my input in their Halloween costumes any longer. In fact, I likely don't want to know too many details about all that transpires at the Halloween parties they attend. It might just scare me to death!


Back when I was on creative costume duty (before there was a costume store at every strip mall in town), I recall that Halloween in Colorado often included cold weather, if not eight inches of snow on the ground. No matter what costume my kids devised, at the last minute, we had to add their winter coats and boots. (It is hard to be a fairy princess under fleece and snow pants.) But they muddled through, knowing they'd look like all the other kids in their winter wardrobe.

Later, being resourceful, the kids learned to incorporate winter gear in their initial design. For instance, my son would dress like a skier who had had a monumental accident on the slopes, complete with "bloody" head bandage, crutches and perhaps a make-shift leg brace. Pretty scarey! Now that marching around the neighborhood to collect candy is not what my kids should do, I hope their costumes can go beyond ski attire! Maybe they will even get to stay warm inside, passing out treats, like I used to do!

I did find a few wonderful images of how other moms are dressing their little ones for Halloween this year. I thought it would be wonderful to let this baby joy speak for itself in today's post: each one certainly put a smile on my face. Please Notice: no coats. Bet they don't live in Colorado!


Thanks for stopping by,
Georgianne


Sunday, October 16, 2011

Eagle View Walk -- 17,400 Steps into Autumn

I have thoroughly enjoyed this 70-degree autumn day in colorful Colorado! Today's agenda included a 2 1/2 hour walk around Standley Lake, which is also an eagle sanctuary. We could see from a distance four eagles in the trees, and one took flight!

The colors of the tress are magnificent right now in the foothills of the Colorado Rockies. Taking a long walk is a great way to see the changing landscape. I wore my trusty step-counter and we logged 17,400 steps by walking completely around this large suburban lake! I've got my feet on ice right now and that feels good!

I hope that you will have a chance to walk through a tree-filled area in the next week so that you can take in the gorgeous colors. The change of season certainly does have its bright side.

Thanks for stopping by,
Georgianne

P.S. In my last blog post I mentioned that once my 100th order was placed from my Nestle and Soar shop on Etsy, I would offer my blog readers 7 days to claim a free gift from www.nestleandsoar.com. Well, that 100th order did arrive on October 15th, so help me celebrate by logging into www.nestleandsoar.com and from there, send me an email with your mailing address. You have until midnight on October 22nd to claim your free gift! Thank you for your interest in my blog and my art!

Tuesday, October 11, 2011

Watch for 100th Nestle and Soar Order on Etsy and You Could Receive a Present!!

Spring Tree Pillow
The Nestle and Soar Studio on Etsy has approached a milestone that I plan to celebrate--will you join me? The next order that comes to me via that shop will be my 100th Etsy Order! Isn't that fun?! I have very much enjoyed getting to know my customers by way of this fun-to-use virtual boutique and I am very grateful for all the support and encouragement I receive there.

Fantastical Tree Pillow
The fiber folk art item that is most often bought via Nestle and Soar on Etsy is...drum roll...custom work. That's right, most of my sales comes from private commissions. It is exciting that this is so, as it means to me that people find it easy to work with me in fulfilling their desire for a one-of-a-kind fiber art item. Out of the 99 orders I've fulfilled from my Etsy shop, 22 of them have been custom work. I hope you'll contact me if that is something you are interested in! You can read more about my commission work here.

Fantastical Tree Pillow
The next most popular item is one of my pillow designs that involves a tree. The Spring Tree Pillow and the Fantastical Tree Pillow are both big winners here at Nestle and Soar. It seems that everywhere I go, I find other tree lovers. In Colorado, trees may not be as old or as plentiful as they are in the eastern states, but folks from Colorado certainly love their trees! That is one of the benefits of operating a global retail shop: tree lovers from around the world tell me that they, too, have this "thing" for trees. I am very pleased to be able to continue my support of the Arbor Day Foundation through all of my different websites. If you love trees, your qualifying order from Nestle and Soar causes a tree to be planted in your honor in our National Forest system. I think that's exciting!

I am planning a special thank you for the person who submits the 100th order on my Etsy shop! I have a few special items in my cache that I haven't ever promoted, and based on what is ordered from me, I will select a special item to pass along. I think this free gift with order needs to find a new home where it can be appreciated by new eyes. Don't you think that would be a wonderful way to celebrate? In fact, on the day that my 100th order comes in, I will open a week of time where my blog readers can contact me via an email on my website, www.nestleandsoar.com. If you send me a note from there, I'll find a little something in my cache to pass along to you, too, just for saying hello! Remember, the one-week time frame for that offer begins on the day that the 100th order is placed, so you may want to keep an eye on my Etsy shopNestle and Soar on Etsy. I hope you can help me celebrate!

Thanks for stopping by,
Georgianne

Thursday, September 29, 2011

Grow like a tree -- Think like a tree

Coexist by Georgianne Holland, 2011
"Think of a tree, or any living event that emerges from within itself. It is the degree to which it obeys its inner commitment to unfold a certain pattern that enables it to overcome all of the resistance and the obstacles in the environment, and to demonstrate itself as a vast and vital manifestation of the energy of Life."
Swami Chetanananda

I have to admit that I do think about trees, if not like them, almost daily. Today, my favorite tree thought is the red maple tree in our front yard, as its leaves have just now begun to turn a coppery-pink color. Soon the entire tree canopy will be bright red and it will be brilliant. I am hopeful we do not get an early Fall snow storm, as that will shorten the fall foliage season considerably. Keep your fingers crossed for me!

My latest fiber art construction titled Coexist is another tree that has kept my mind busy. There are 12 birds of different colors nestled in the branches of this wool tree, and the leaves are appliqued wool, which cause them to protrude, or have that 3D-effect. The entire piece is made of wool, and is mounted on ivory linen in a wooden frame. It is my hope that this Coexist design will come to signify the unity that I believe exists between all people, for even as we have unique characteristics, we are all members of the human family. Chetanananda speaks of this as the vital manifestation of the energy of Life, and that energy can provide worldwide harmony. That is my prayer.

The Arbor Day Foundation is supported by my artwork and the success of my Nestle and Soar Studio. I received recently their journal where I read a vitally interesting article about how trees can tame storm water problems in communities everywhere. Most cities and towns in the United States have water systems that were constructed generations ago, and because they are underground and out of sight, their overwhelmed condition can be "out of mind" to most of us. Abundant trees can help curb costly storm water runoff, which is another benefit to trees that may not be top-of-mind. If you'd like to learn more about how you, your business, or your community can participate in water-system health through green landscapes, see the nice folks at www.arborday.org/stormwater.

Thanks for stopping by,
Georgianne

Wednesday, September 21, 2011

Knit Three, Crochet None -- from Etsy

Full of Holes Pattern from 2SistersStringworks in Canada
There are so many resources on Etsy.com for people who want to be creative. I bought some lovely yarn at the Wool Festival in Estes Park, Colorado this summer, and stopped by Etsy today to find a few beginner knitting patterns to use with this yarn. As a member of this creative community, it is nice to know I can buy handmade items, and also, get help on making handmade items that are not yet part of my skill set!

3 Dish Cloth Patterns from KooklaCreations
I thought I'd share the three beginner knitting projects I fell in love with, and while there is no crochet involved at this time, I may challenge myself next month with a beginner crochet project. Does anyone have suggestions about what I should take on as my first crochet effort? I'm sure I'll need moral support :-)

The first project is a lovely triangular scarf pattern from 2SistersStringworks in Canada. I'm assured it is easier to knit than it looks, and I am counting on that. I have a gorgeous blue/cream/green variegated yarn to use for this project; won't that be great!

Olivia Scarf Kit from DaisyAndFlorrie on Etsy
The next project I'd like to try comes from Sydney Australia and the Etsy shop of KooklaCreations. I think that these dish cloths will be a perfect way for me to practice knitting stitches in a small format. Once I get the hang of the pattern, I will have confidence to try a larger project with more than the garter stitch. Brilliant! Also, when knit with a cotton yarn, these dish cloths will dry quickly and be a colorful addition to my kitchen...or your kitchen: great gift idea!


The final awesome beginner knitting project I found today comes from DaisyAndFlorrie of Chicago. This sweet kit is so appealing to me, I think I'll need to buy more than one. I'm thinking the kit itself would be a great gift item as I'd like to encourage a few of my non-knitting friends to take up the craft! With this gift, we can all knit together and that will make it more fun. I guess I'll just have to save my other Wool Festival yarns for the cold months ahead...and perhaps my growing confidence with being the kind of knitter who can do more than just "make garter stitch scarves" will blossom. You never know...it could happen!


Thanks for stopping by,
Georgianne

Friday, September 16, 2011

How to Make It on Friday

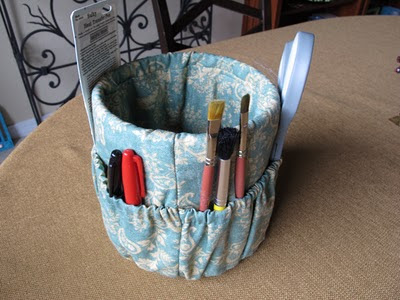
There are never enough ways for a busy studio space to provide storage. Especially when the studio is the home of a fiber artist, and said fiber artist likes to have multiple projects in process at all times. Add to those storage needs a few daily drop-in visitors or students who need one-on-one sewing instruction, and what you have is a hot mess.

I want to share with you one easy way to help in this situation using common materials and 20 minutes of sewing time. This Coffee Can Organizer is easy to make with scrap fabrics, a few feet of yarn as well as 3/8" elastic. I pilfered an empty coffee can from my husband's collection in the garage. If you don't have access to such a collection (lucky you), you can also use an empty paint can available at your local big box home improvement store for about $4. Or, you could just quickly drink a lot of coffee..whichever way works best for you.

Here are the 9 steps to take in making your very useful Coffee Can Organizer
1. Measure circumference and height of can to be covered; add two inches to each dimension. Cut out two rectangles of this size from scrap fabric; these will make the outside and inside of your can cover.
2. Using the dimensions of your two rectangles as your guide, add 10" to the longest dimension and cut a third rectangle from your fabric; this will make the elasticized pocket.
3. With right sides together, using a 1/2" seam, sew the two rectangles from step one above along one of the longest sides. Press that seam flat to one side and stitch it down 1/4" away from stitching line. You now have a larger rectangle with a finished seam in the middle.
4. Press your elasticized pocket piece from step 2 in half, wrong sides together. Sew a 1/2" channel along this pressed edge, leaving the start/finish open (you will insert elastic into this channel). Using a safety pin as your guide, thread 3/8" elastic through channel and sew the start end to the fabric to secure it. Use your safety pin to secure the ending tail of elastic after it is completely through the channel (you won't know wet how firmly to pull the elastic for your particular can, so securing it with safety pin is just the thing to do).
5. Place the elasticized pocket on the bottom of your larger rectangle, which you created in step 3. Pin it in place. Refer to your measurement of the circumference of the can you are covering and gently ease the elastic so that the pocket top is 2-3 inches smaller than the can's circumference. This will allow the items you place in the pockets to be held in place by the elastic. Sew pocket dividers vertically from top of pocket to bottom of pocket, roughly every 3-4 inches. I have 5 pockets in my Coffee Can Organizer using this method.
6. Now that you have elastic in the piece, it will bunch up in a weird way. That's okay. Allowing for that, to complete the next step, place the can cover over your coffee can, right side touching the can. [If there happens to be another person available to you, now is great time to ask for a third hand!] Stretching the can cover over the can at this time allows you to pin the seams shut that you will be sewing in the next step. It will help you "sew to fit" the can you are covering. Remove can cover carefully from the can to avoid being pricked by pins.
7. With right sides together and the finished seam you just made horizontally located across the middle, stitch this larger rectangle into a tube shape, using a 1/2" seam. This step is a little unwieldy because of the elastic, but you can do it. Try to keep your 1/2" seam allowance along the whole seam length.
8. At each open end of your lovely tube, turn under 1/2" onto the inside of the tube, like you are hemming it. Press or sew that 1/2" turn-under flat. Now you are going to repeat that action, turning under another 1/2" on each end of the tube, but this time, sew the "hem" down leaving a small opening at the start/finish, creating a casing that can have a length of yarn inserted to drawstring the tube-ends shut.
9. Turn your can cover right sides out and stretch it over your can. The elasticized pocket should be on the outside of the can and the horizontal seam in the middle should be at the lip of the can. Push down into the can the rest of the rectangle, which is the lining fabric. Thread a piece of yarn into the channels on at each end of the can cover. Pull the yarn to gently close the tube ends and tie off the yarn.

Well, there you have it! I have placed my Covered Coffee Can on my largest work table. It is light weight, so when I need to reach way out to pick it up and take it with  me to another part of the studio, it is easy to do. I have each student make one of these to keep their supplies in order and we store them in a cupboard until the next time they are working with me in the studio. Also, they are creative! Each one is unique and fun to have out--they decorate the worktables!

BONUS IDEA You can also make one these cans for your next party...fill the outside pockets with silverware and place a handful of napkins in the middle...quick and easy way to entertain for a large group.

Thanks for stopping by,
Georgianne