Showing posts with label sewing. Show all posts

Tuesday, August 13, 2013

Fiber Art in Action: Do you Dress Locally or do you Dress Globally?

Rebecca Burgess
Have you ever made an effort to eat local, organic foods? I belonged to our local CSA (Community Sponsored Agriculture) co-op last summer and enjoyed food grown near my own backyard. I love the idea of keeping my purchasing power in my own part of Colorado! It is environmentally friendly to do this, especially as you consider the reduced effort required to ship or transport items to my front door.

I recently learned about Rebecca Burgess who has been inspired to start a fiber co-op, called a Fibershed, that has been built using this same love of keeping things local. In a working Fibershed, folks combine forces with their neighbors to capitalize on their various fiber "processing" skills, like weaving, dying, hemp cultivation, spinning, and garment sewing, and then they join together to sell the combined products of the larger community.

So my question to you is, have you ever considered "dressing locally"? If you were required to dress yourself and your family using only fabrics or clothing manufactured within 200 miles of your own home, would you even know where to start?

There are obstacles to this type of green economy. Rebecca reports that the largest barrier to dressing locally is that there are few fiber artists who loom fabric made with locally-grown raw materials. Finding people to sew clothing for you, if you are unable or unwilling to sew it yourself, is also an obstacle. So perhaps we won't be able to buy clothing made totally from local raw materials, but we can certainly open our minds to that possibility!

Do you find in your community that people have developed the habit of buying clothing that is made inexpensively and without regard to the conditions under which those clothes are made? One of Rebecca's comments that really hit me between the eyes is her explanation about dyeing fabrics in the August 2013 issue of American Craft magazine. She talks in that article about the externalized costs of ecology and labor. Take the manufacture of blue jeans for example. "The face-value cost to shop at Walmart versus the real cost of shopping at Walmart: the Pearl River Delta [an industrial region in China], where most jeans are made [along with the resulting pollution]; genetically modified cotton fields; suicides related to that kind of practice because farmers are so deeply in debt" ...all of this is part of the narrative that Rebecca provides consumers about the way most of us in the US have gotten used to shopping for blue jeans: convenient, fast, inexpensive, and easily available. Perhaps you are ready to step away from this "fast-food" mentality regarding the way you dress? I know that I am!

What kind of alternatives are available to you and me for buying clothing made in healthy circumstances with fibers that have a reduced polluting impact on the Earth?
 
Fibershed has created an online marketplace to connect farmers, artisans, and consumers. That choice means that the manufacturing of the clothing may not happen directly in your own community, but it does mean that you and I will be better informed about the health of the garments we buy. I am always in favor of supporting independent artisans.

Bullet Blues is a company in Florida that makes from American-made denim fashionable blue jeans that are sewn in Florida. For me, that's a step in the right direction.

Earth Creations is a company that I have recently found and find helpful in my desire to shop for clothing that is made in healthy circumstances. "The sewing facility where most of our garments are sewn is located in rural Alabama. Our employees are paid a fair wage and work in a clean and safe environment. They actually believe in what they do and enjoy their work. By providing local jobs, hopefully we help keep a piece of our rural American culture alive."

What resources have you found to dress locally where you live? Are you a fiber artist who would love to be connected with a Fibershed community in your town or city? I would love to hear from all of you!

Thanks for stopping by,
Georgianne
Georgianne


Monday, February 20, 2012

Good to Know -- Insights for the Creative Life

Rocket Kiddie Ride ©Feltmates, on Etsy
Independent creatives from around the world have found Etsy.com to be a beneficial business tool on many different levels. Today I am pleased to interview a talented and successful artist who has made her shop on Etsy, Feltmates, an important part of her success as a felt artist. Yoko Nomura opened Feltmates from Wisconsin in May of 2008. She creates absolutely charming characters from felt using 3D sewing construction techniques and felting, with brooches and pincushions being her largest shop sections. With over 700 sales and gallery exhibitions around the United States, Yoko has wonderful insights to share. She's given us all thoughtful insights that are good to know.

Georgianne Holland: In your profile on Etsy, you talk about blending traditional craftsmanship and a contemporary style. Can you please talk to us about how you define your traditional skills, where/how you learned them, and how art involving needlework fits into your professional goals? To stir up your thought process:  the traditional needle arts used to be considered homemaking skills, not art. Also, many needle-crafted items are imported to the U.S. How do you want the consumer to think about you being a maker of American handmade, in that reality?

Yoko Nomura: I studied ceramics in college.  After graduation, I worked as a designer for a company which produced handbag lines in collaboration with well-known designers.  I learned many important skills from this experience.  I was involved in the entire process, from concept and design to making the patterns and the sample handbags. 

Lion Measuring Tape ©Feltmates, on Etsy
In the late 1990’s, I became acquainted with some felt artists.  I was inspired by the idea of making your own material in which to work with. I started to design my own work with my own material, felt.  Felt was first made more than 8,000 years ago.  This ancient handmade fabric was the perfect medium for me to work with.  It merged the skills I had learned from working in ceramics and in fashion design. I am still fascinated by the way the felt can be made into almost any shape.  In this way, felt can blur the disparity between craft and art.  I am happy having my work defined as either and do enjoy making both functional homemaking supplies and sculptural pieces.    

G.H.: Is Etsy your primary avenue for merchandising your art? If not, what other avenues do you use? Your sculptural pieces, like Knitting Chicken and Rocket Kiddie Ride, would be ideal in a gallery setting! I'd certainly want to see them in person...
 
Y.N.: I am very grateful for the success I’ve had on Etsy.  In addition to Etsy, I have also shown my work in group exhibition in galleries around America.  Also, I do some craft shows around the Midwest during the holiday season.  I usually preview my work and announce my schedule on my Flickr site ( flickr.com/photos/feltmates ) and also by sending out emails to my mailing list.  Flickr helps me judge how people will react to my new ideas when I receive their comments and feedback.
Knitting Chicken ©Feltmates, on Etsy
G.H.: What advice do you have for using Etsy as a marketing tool? If you could turn back time, would you do anything differently? As you have been shopkeeping there since May, 2008, I'll bet you have insights to share :)
Y.N.: I have had galleries and magazines which have contacted me because they saw my work on Etsy.  I think a lot of people search for new artists on Etsy because there are so many amazing artists that have shops on their site.  Like everyone mentions, your photographs are so important.  Customers are not able to touch or see your artwork in person until they purchase and receive it.  I try to take pictures that look nice and have little difference between the photographic image and the real items, different view points and angles help.  Also, try to keep your shop looking fresh.  This is good for both new and returning customers.  Try new ideas and different colors choices to give customers more choices. The most important thing is to continue to enjoy making your work!  I believe that this feeling of enjoyment comes across to your customers.
I hope you will take a moment to visit Feltmates to see Yoko's terrific artistry, her bright and inspiring photos of her items, and the fun selection she has to offer at this time. When you do, it will be easy to see why so many consider her Etsy shop to be a favorite!
Thanks for stopping by,
Georgianne

Thursday, November 3, 2011

Where Did You Learn the Needle Arts?

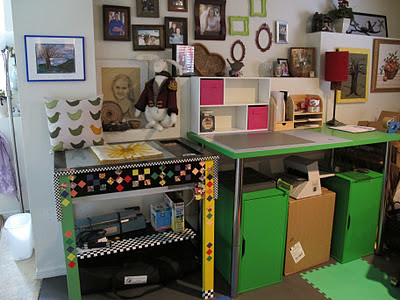
My mom and I decorated this light table 15 years ago to trace patterns!
I am asked where I learned to sew, embroider, felt, quilt, and knit. Perhaps you are, too? Because I'm in my 50s, I was lucky enough to have Home Economics as part of my junior high school curriculum. Most of the women who ask me where I learned to sew are young enough, that they had no Home Economics teacher in school. They may not know a single person who sews. But oh yes, they want to learn!

Sewing and all the needle arts are certainly in another rejuvenation. In the 1970s, I remember my 20-something year old friends talking about how quilting was being reinvigorated as an important needle art. Quilting, as well as many other needle arts, keep cycling around in popularity. For those who make a living in creative fields that cater to women, the needle arts as an industry is not only popular, but a legitimate form of economic empowerment. Home Economics may not be taught in public schools any longer, but we all can certainly learn to sew throughout our communities!

I am fortunate to be from a family that honored and taught the needle arts for over 30 years. My parents, George and Bonnie Leman, as well as my six siblings, owned and operated a Colorado-based company called Leman Publications. We began publishing Quilter's Newsletter Magazine in 1969 and enjoyed many happy years being the family that worked as a team to teach the world to quilt. How fortunate for me to have Bonnie Leman as my mom and my inspiration in the fiber arts! She instilled in me the love of all needle arts as well as the love of joining forces with other women as they work to build a successfully creative life.

In addition to this entrepreneurial jump start, I will admit that I began sewing my own clothes at age 12. I have always loved working with fabric, textiles, and colors. Like so many women who are long-time subscribers to Quilter's Newsletter Magazine, I have been fortunate to combine my love of raising a family with operating a successful fiber folk art studio from home!

Where did you learn to sew, embroider, felt, quilt, or knit? I'd love to hear your story!
Thanks for stopping by,
Georgianne

Friday, September 16, 2011

How to Make It on Friday

There are never enough ways for a busy studio space to provide storage. Especially when the studio is the home of a fiber artist, and said fiber artist likes to have multiple projects in process at all times. Add to those storage needs a few daily drop-in visitors or students who need one-on-one sewing instruction, and what you have is a hot mess.

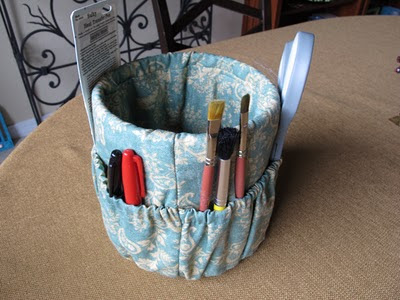
I want to share with you one easy way to help in this situation using common materials and 20 minutes of sewing time. This Coffee Can Organizer is easy to make with scrap fabrics, a few feet of yarn as well as 3/8" elastic. I pilfered an empty coffee can from my husband's collection in the garage. If you don't have access to such a collection (lucky you), you can also use an empty paint can available at your local big box home improvement store for about $4. Or, you could just quickly drink a lot of coffee..whichever way works best for you.

Here are the 9 steps to take in making your very useful Coffee Can Organizer
1. Measure circumference and height of can to be covered; add two inches to each dimension. Cut out two rectangles of this size from scrap fabric; these will make the outside and inside of your can cover.
2. Using the dimensions of your two rectangles as your guide, add 10" to the longest dimension and cut a third rectangle from your fabric; this will make the elasticized pocket.
3. With right sides together, using a 1/2" seam, sew the two rectangles from step one above along one of the longest sides. Press that seam flat to one side and stitch it down 1/4" away from stitching line. You now have a larger rectangle with a finished seam in the middle.
4. Press your elasticized pocket piece from step 2 in half, wrong sides together. Sew a 1/2" channel along this pressed edge, leaving the start/finish open (you will insert elastic into this channel). Using a safety pin as your guide, thread 3/8" elastic through channel and sew the start end to the fabric to secure it. Use your safety pin to secure the ending tail of elastic after it is completely through the channel (you won't know wet how firmly to pull the elastic for your particular can, so securing it with safety pin is just the thing to do).
5. Place the elasticized pocket on the bottom of your larger rectangle, which you created in step 3. Pin it in place. Refer to your measurement of the circumference of the can you are covering and gently ease the elastic so that the pocket top is 2-3 inches smaller than the can's circumference. This will allow the items you place in the pockets to be held in place by the elastic. Sew pocket dividers vertically from top of pocket to bottom of pocket, roughly every 3-4 inches. I have 5 pockets in my Coffee Can Organizer using this method.
6. Now that you have elastic in the piece, it will bunch up in a weird way. That's okay. Allowing for that, to complete the next step, place the can cover over your coffee can, right side touching the can. [If there happens to be another person available to you, now is great time to ask for a third hand!] Stretching the can cover over the can at this time allows you to pin the seams shut that you will be sewing in the next step. It will help you "sew to fit" the can you are covering. Remove can cover carefully from the can to avoid being pricked by pins.
7. With right sides together and the finished seam you just made horizontally located across the middle, stitch this larger rectangle into a tube shape, using a 1/2" seam. This step is a little unwieldy because of the elastic, but you can do it. Try to keep your 1/2" seam allowance along the whole seam length.
8. At each open end of your lovely tube, turn under 1/2" onto the inside of the tube, like you are hemming it. Press or sew that 1/2" turn-under flat. Now you are going to repeat that action, turning under another 1/2" on each end of the tube, but this time, sew the "hem" down leaving a small opening at the start/finish, creating a casing that can have a length of yarn inserted to drawstring the tube-ends shut.
9. Turn your can cover right sides out and stretch it over your can. The elasticized pocket should be on the outside of the can and the horizontal seam in the middle should be at the lip of the can. Push down into the can the rest of the rectangle, which is the lining fabric. Thread a piece of yarn into the channels on at each end of the can cover. Pull the yarn to gently close the tube ends and tie off the yarn.

Well, there you have it! I have placed my Covered Coffee Can on my largest work table. It is light weight, so when I need to reach way out to pick it up and take it with  me to another part of the studio, it is easy to do. I have each student make one of these to keep their supplies in order and we store them in a cupboard until the next time they are working with me in the studio. Also, they are creative! Each one is unique and fun to have out--they decorate the worktables!

BONUS IDEA You can also make one these cans for your next party...fill the outside pockets with silverware and place a handful of napkins in the middle...quick and easy way to entertain for a large group.

Thanks for stopping by,
Georgianne

Thursday, April 7, 2011

Honoring those who make our clothes

When you shop for clothes, is it hard for you to buy items you could easily make for yourself? I have this problem. I want to get over it though, because I tell myself I will make the simple A-line skirt from sweet cotton fabric instead of buying it, and then I never do. When a person knows how to sew clothes, it changes the way they feel about clothes. At least it does for me.

I read about another gal who thinks a lot about clothes and who is making clothes around the world. I learned about Lea Redmond and her tag exchange program in the Surface Design Associations magazine. How inspiring! Lea has a website called Leafcutter Designs, and from it, she exchanges a clothing tag you cut out of one of your garments for the tag shown in this photo. You sew the special tag into your garment, and when it gets passed on to a friend, sold on consignment, or given as a gift, it becomes a message to the next owner of that garment! I am going to participate as I have always had the feeling of connection with the person who sewed my clothes. I know what it takes to make a quality garment, and I admire the skill and effort. I also often worry about the working conditions of these folks. Do you ever think that a great price on an intricately made item is not so wonderful for the person who made it? How do you think about this?

These clothing tags from Lea were woven in the Eastern USA and she asks for a reasonable donation of $1 for each tag you'd like to exchange. If you cannot contribute the $1, she asks that you do not request more than 5 tag exchanges. She is keeping a map of the tags she has exchanged and it is fun for me to think of clothing around the world carrying this message of care, respect, fairness, and honor for those who make our clothes.

Thanks for stopping by,
Georgianne