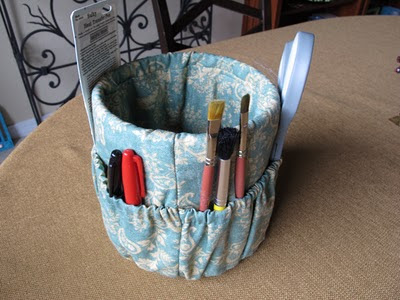
There are never enough ways for a busy studio space to provide storage. Especially when the studio is the home of a fiber artist, and said fiber artist likes to have multiple projects in process at all times. Add to those storage needs a few daily drop-in visitors or students who need one-on-one sewing instruction, and what you have is a hot mess.
I want to share with you one easy way to help in this situation using common materials and 20 minutes of sewing time. This Coffee Can Organizer is easy to make with scrap fabrics, a few feet of yarn as well as 3/8" elastic. I pilfered an empty coffee can from my husband's collection in the garage. If you don't have access to such a collection (lucky you), you can also use an empty paint can available at your local big box home improvement store for about $4. Or, you could just quickly drink a lot of coffee..whichever way works best for you.
Here are the 9 steps to take in making your very useful Coffee Can Organizer
1. Measure circumference and height of can to be covered; add two inches to each dimension. Cut out two rectangles of this size from scrap fabric; these will make the outside and inside of your can cover.
2. Using the dimensions of your two rectangles as your guide, add 10" to the longest dimension and cut a third rectangle from your fabric; this will make the elasticized pocket.
3. With right sides together, using a 1/2" seam, sew the two rectangles from step one above along one of the longest sides. Press that seam flat to one side and stitch it down 1/4" away from stitching line. You now have a larger rectangle with a finished seam in the middle.
4. Press your elasticized pocket piece from step 2 in half, wrong sides together. Sew a 1/2" channel along this pressed edge, leaving the start/finish open (you will insert elastic into this channel). Using a safety pin as your guide, thread 3/8" elastic through channel and sew the start end to the fabric to secure it. Use your safety pin to secure the ending tail of elastic after it is completely through the channel (you won't know wet how firmly to pull the elastic for your particular can, so securing it with safety pin is just the thing to do).
5. Place the elasticized pocket on the bottom of your larger rectangle, which you created in step 3. Pin it in place. Refer to your measurement of the circumference of the can you are covering and gently ease the elastic so that the pocket top is 2-3 inches smaller than the can's circumference. This will allow the items you place in the pockets to be held in place by the elastic. Sew pocket dividers vertically from top of pocket to bottom of pocket, roughly every 3-4 inches. I have 5 pockets in my Coffee Can Organizer using this method.
6. Now that you have elastic in the piece, it will bunch up in a weird way. That's okay. Allowing for that, to complete the next step, place the can cover over your coffee can, right side touching the can. [If there happens to be another person available to you, now is great time to ask for a third hand!] Stretching the can cover over the can at this time allows you to pin the seams shut that you will be sewing in the next step. It will help you "sew to fit" the can you are covering. Remove can cover carefully from the can to avoid being pricked by pins.
7. With right sides together and the finished seam you just made horizontally located across the middle, stitch this larger rectangle into a tube shape, using a 1/2" seam. This step is a little unwieldy because of the elastic, but you can do it. Try to keep your 1/2" seam allowance along the whole seam length.
8. At each open end of your lovely tube, turn under 1/2" onto the inside of the tube, like you are hemming it. Press or sew that 1/2" turn-under flat. Now you are going to repeat that action, turning under another 1/2" on each end of the tube, but this time, sew the "hem" down leaving a small opening at the start/finish, creating a casing that can have a length of yarn inserted to drawstring the tube-ends shut.
9. Turn your can cover right sides out and stretch it over your can. The elasticized pocket should be on the outside of the can and the horizontal seam in the middle should be at the lip of the can. Push down into the can the rest of the rectangle, which is the lining fabric. Thread a piece of yarn into the channels on at each end of the can cover. Pull the yarn to gently close the tube ends and tie off the yarn.
Well, there you have it! I have placed my Covered Coffee Can on my largest work table. It is light weight, so when I need to reach way out to pick it up and take it with me to another part of the studio, it is easy to do. I have each student make one of these to keep their supplies in order and we store them in a cupboard until the next time they are working with me in the studio. Also, they are creative! Each one is unique and fun to have out--they decorate the worktables!
BONUS IDEA You can also make one these cans for your next party...fill the outside pockets with silverware and place a handful of napkins in the middle...quick and easy way to entertain for a large group.
Thanks for stopping by,
Georgianne


1 comment:
Perfect! Simple and easy to sew. Thank You.
Post a Comment